Self Host Windmill
Self-host Windmill on your own infrastructure.
For small setups, use Docker and Docker Compose on a single instance. For larger and production use-cases, use our Helm chart to deploy on Kubernetes.

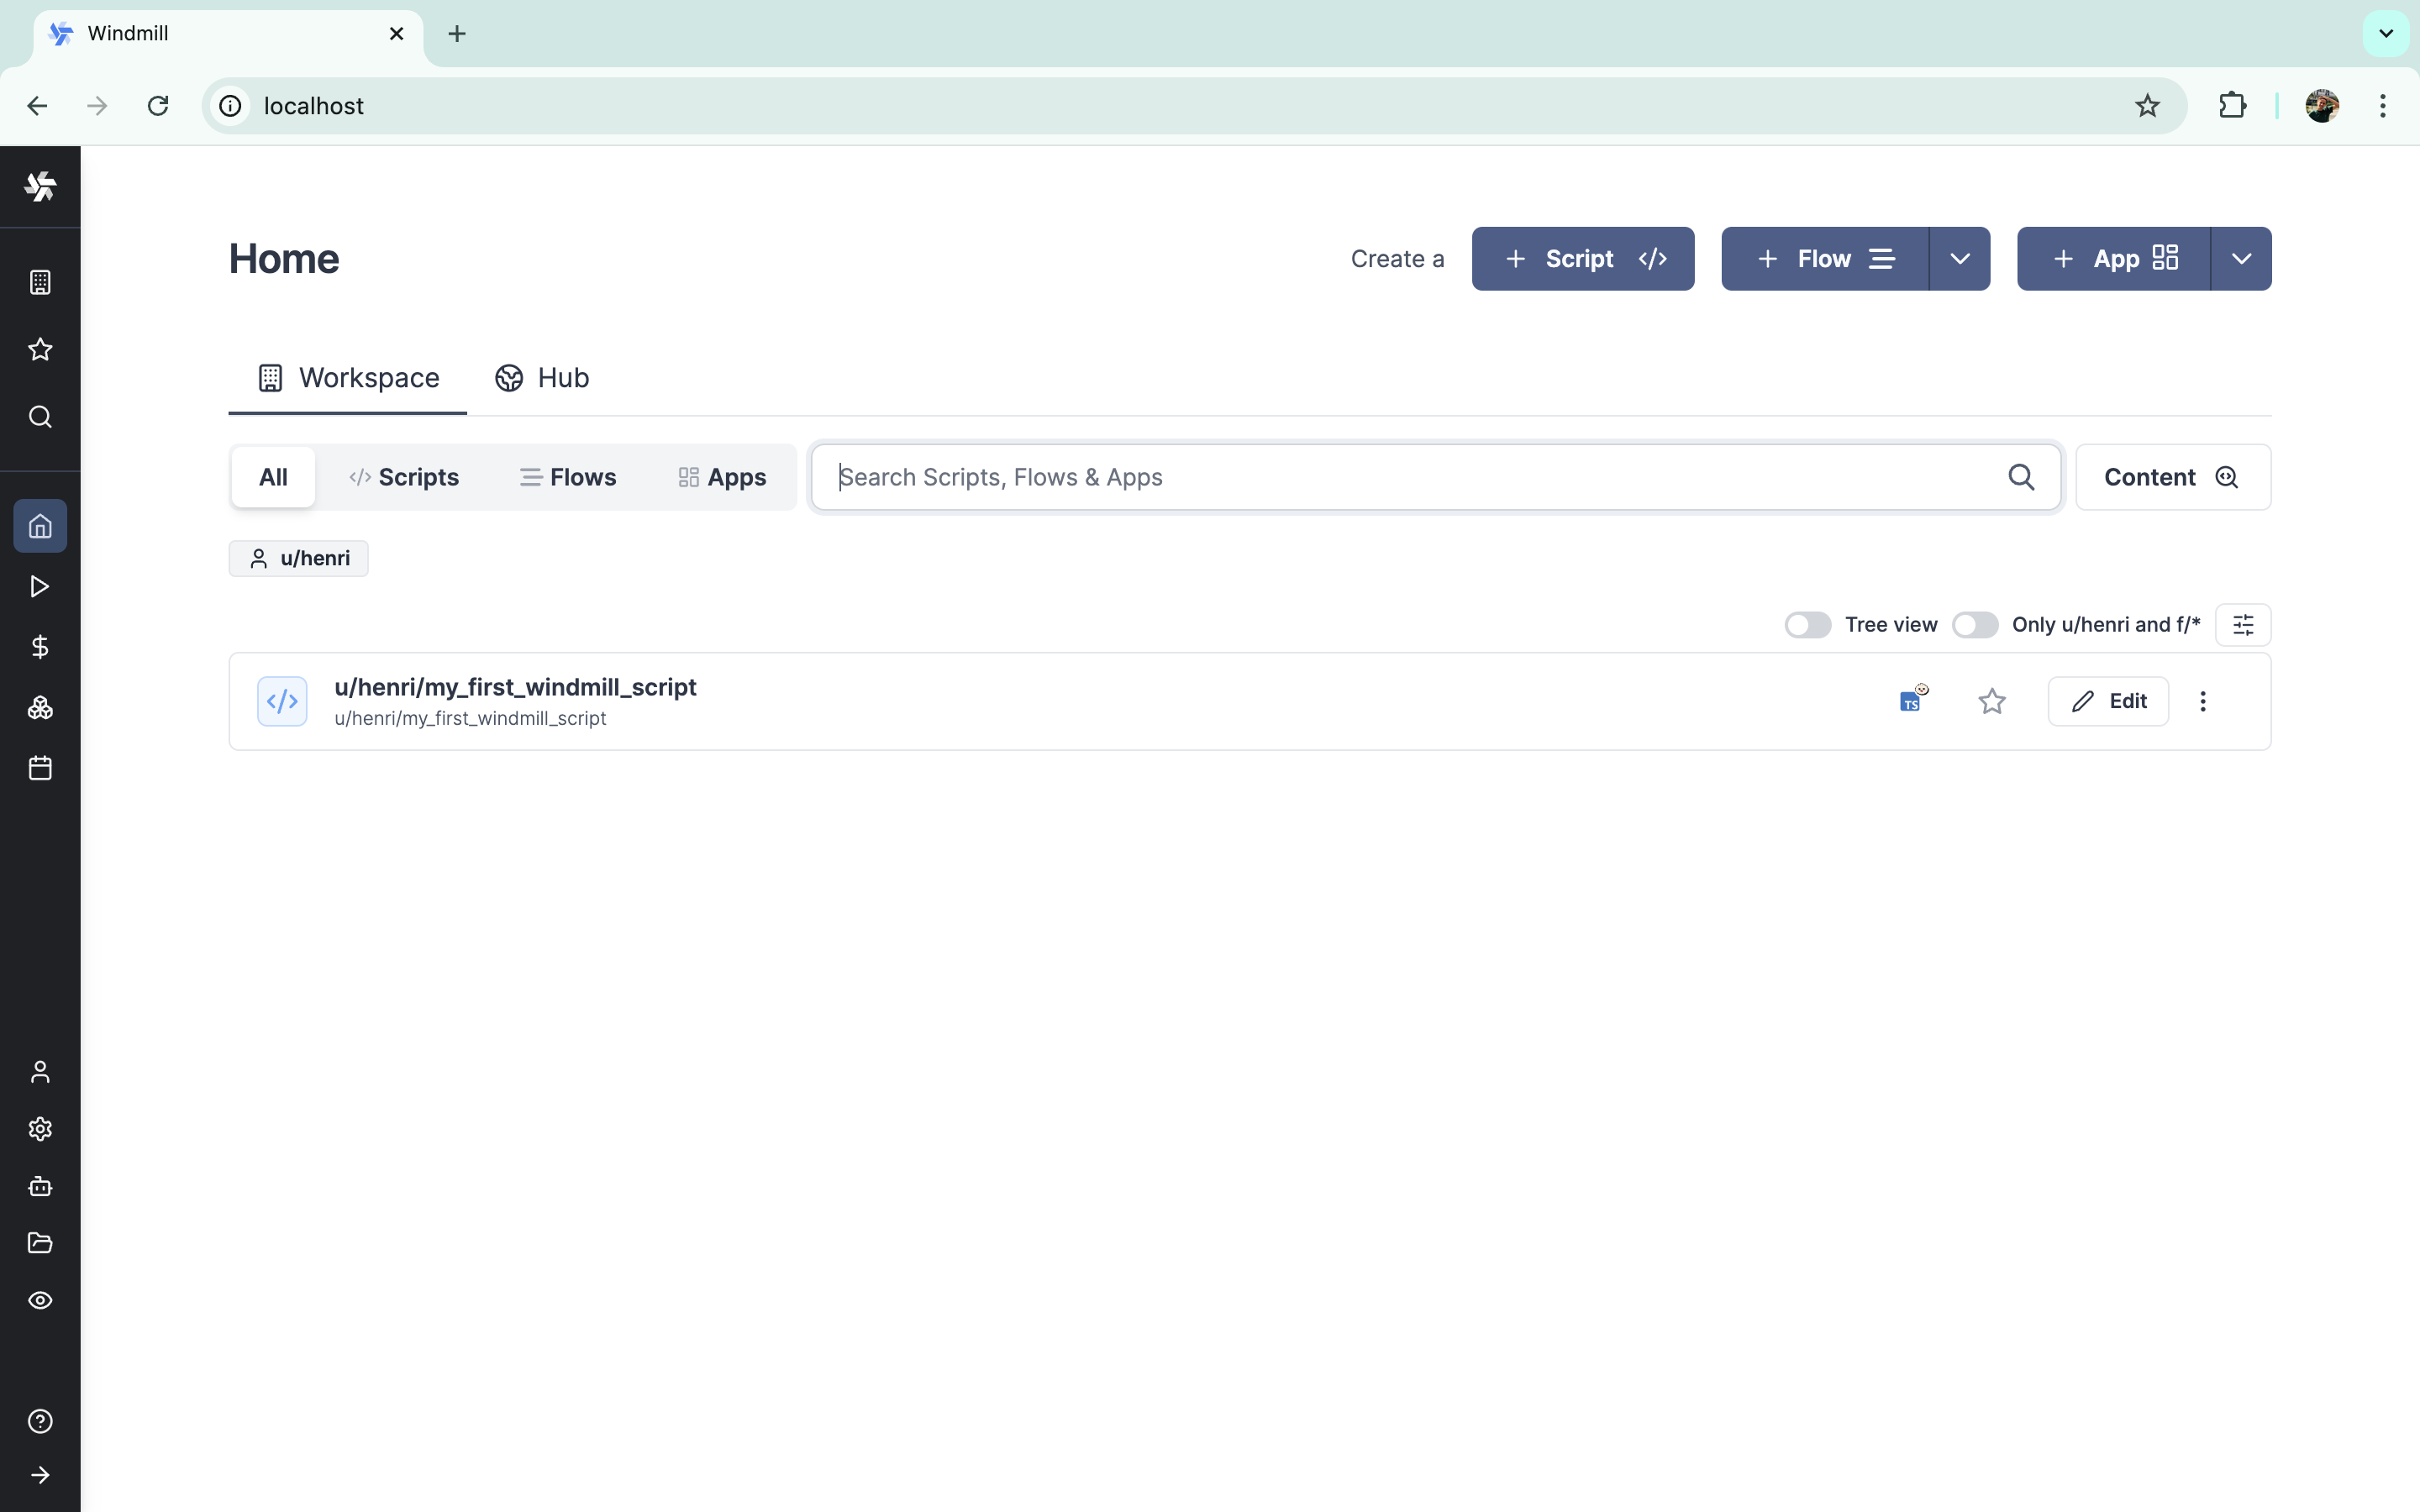
Example of a self-hosted Windmill instance on localhost.
Windmill itself just requires 3 components:
- A Postgres database, which contains the entire state of Windmill, including the job queue.
- The Windmill container running in server mode (and replicated for high availability). It serves both the frontend and the API. It needs to connect to the database and is what is exposed publicly to serve the frontend. It does not need to communicate to the workers directly.
- The Windmill container running in worker mode (and replicated to handle more job throughput). It needs to connect to the database and does not communicate to the servers.
There are 3 optional components:
- Windmill LSP to provide intellisense on the Monaco web Editor.
- Windmill Multiplayer (Cloud & Enterprise Selfhosted only) to provide real time collaboration.
- A reverse proxy (caddy in our Docker compose) to the Windmill server, LSP and multiplayer in order to expose a single port to the outside world.
The docker-compose file below uses all six components, and we recommend handling TLS termination outside of the provided Caddy service..
Cloud provider-specific guides
For instances with specific cloud providers requirements:
If you have no specific requirements, see Docker.
AWS, GCP, Azure, Neon
We recommend using the Helm chart to deploy on managed Kubernetes. But for simplified setup, simply use the docker-compose (see below) on a single large instance and use a high number of replicas for the worker service.
The rule of thumb is 1 worker per 1vCPU and 1-2 GB of RAM. Cloud providers have managed load balancer services (ELB, GCLB, ALB) and managed database (RDS, Cloud SQL, Aurora, Postgres on Azure). We recommend disabling the db service in docker-compose and using an external database by setting the DATABASE_URL in the .env file for handling environment variables.
Windmill is compatible with AWS Aurora, GCP Cloud SQL, Azure and Neon serverless database.
Use the managed load balancer to point to your instance on the port you have chosen to expose in the caddy section of the docker-compose (by default 80). We recommend doing TLS termination and associating your domain on your managed load balancer. Once the domain name is chosen, set BASE_URL accordingly in .env. That is it for a minimal setup. Read about Worker groups to configure more finely your workers on more nodes and with different resources. Once done, be sure to setup SSO login with Azure AD, Google Workspace or GitHub if relevant.
To be able to use the AWS APIs within Windmill on ECS containers, just whitelist the following environment variables in .env:
WHITELIST_ENVS = "AWS_EXECUTION_ENV,AWS_CONTAINER_CREDENTIALS_RELATIVE_URI,AWS_DEFAULT_REGION,AWS_REGION"
Fly.io
Hetzner, Fargate, Digital Ocean, Linode, Scaleway, Vultr, OVH, ...
Windmill works with those providers using the Docker containers and specific guides are in progress.
Docker
Setup Windmill on localhost
Self-host Windmill in less than a minute:
Using Docker and Caddy, Windmill can be deployed using 3 files:
(docker-compose.yml, Caddyfile) and a .env in a single command.
Caddy is the reverse proxy that will redirect traffic to both Windmill (port 8000) and the LSP (the monaco assistant) service (port 3001) and multiplayer service (port 3002). It also redirects TCP traffic on port 25 to Windmill (port 2525) for email triggers. Postgres holds the entire state of Windmill, the rest is fully stateless, Windmill-LSP provides editor intellisense.
Make sure Docker is started:
- Mac:
open /Applications/Docker.app - Windows:
start docker - Linux:
sudo systemctl start docker
and type the following commands:
curl https://raw.githubusercontent.com/windmill-labs/windmill/main/docker-compose.yml -o docker-compose.yml
curl https://raw.githubusercontent.com/windmill-labs/windmill/main/Caddyfile -o Caddyfile
curl https://raw.githubusercontent.com/windmill-labs/windmill/main/.env -o .env

docker compose up -d
Go to http://localhost et voilà!
Even if you setup oauth, login as admin@windmill.dev / changeme to setup the instance & accounts and give yourself super-admin privileges. Have them pre-filled at http://localhost/user/login?email=admin@windmill.dev&password=changeme.
From there, you can follow the setup app to replace the superadmin account and schedule a sync of resources (by default, everyday).
Use an external database
For more production use-cases, we recommend using the Helm-chart. However, the docker-compose on a big instance is sufficient for many use-cases.
To setup an external database, you need to set DATABASE_URL in the .env file to point your external database. You should also set the number of db replicas to 0.
In setups where you do not have access to the PG superuser (Azure PostgreSQL, GCP Postgresql, etc), you will need to set the initial role manually. You can do so by running the following command:
curl https://raw.githubusercontent.com/windmill-labs/windmill/main/init-db-as-superuser.sql -o init-db-as-superuser.sql
psql <DATABASE_URL> -f init-db-as-superuser.sql
Make sure that the user used in the DATABASE_URL passed to Windmill has the role windmill_admin and windmill_user:
GRANT windmill_admin TO <user used in database_url>;
GRANT windmill_user TO <user used in database_url>;
If you cannot use BYPASSRLS (for instance on Azure PostgreSQL), on EE, pass MIGRATION_NO_BYPASSRLS=true to your servers, otherwise see this workaround
Set number of replicas accordingly in docker-compose
In the docker-compose, set the number of windmill_worker and windmill_worker_native replicas to your needs.
Enterprise Edition
To use the enterprise edition, you need pass the license key in the instance settings.
You can then set the number of replicas of the multiplayer container to 1 in the docker-compose.
You will be provided a license key when you purchase the enterprise edition or start a trial. Start a trial from the Pricing page or contact us at contact@windmill.dev to get a trial license key. You will benefit from support, SLA and all the additional features of the enterprise edition.
More details at:
Configuring Domain and Reverse Proxy
To deploy Windmill to the windmill.example.com domain, make sure to set "Base Url" correctly in the Instance Settings.
You can use any reverse proxy as long as they behave mostly like the default provided following caddy configuration:
:80 {
        bind {$ADDRESS}
        reverse_proxy /ws/* http://lsp:3001
        reverse_proxy /* http://windmill_server:8000
}
The default docker-compose file exposes the caddy reverse-proxy on port 80 above, configured by the caddyfile curled above. Configure both the caddyfile and the docker-compose file to fit your needs. The documentation for caddy is available here.
Use provided Caddy to serve https
For simplicity, we recommend using an external reverse proxy such as Cloudfront or Cloudflare and point to your instance on the port you have chosen (by default, :80).
However, Caddy also supports HTTPS natively via its tls directive. Multiple options are available. Caddy can obtain certificates automatically using the ACME protocol, a provided CA file, or even a custom HTTP endpoint. The simplest is to provide your own certifcate and key files. You can do so by mounting an additional volume containing those two files to the Caddy container and adding a tls /path/to/cert.pem /path/to/key.pem directive to the Caddy file. Make sure to expose the port :443 instead of :80 and Caddy will take care of the rest.
For all the above, see the commented lines in the caddy section of the docker-compose.
Traefik configuration
Here is a template of a docker-compose to expose Windmill to Traefik. Make sure to replace the traefik network with whatever network you have it running on. Code below:
You may need to adapt this depending on if you have Traefik running or on your configuration. This also assumes you have a letsencryptresolver or change the name to your certificate resolver if you want to use the websecure entrypoint.
version: '3.7'

services:
  db:
    deploy:
      # To use an external database, set replicas to 0 and set DATABASE_URL to the external database url in the .env file
      replicas: 1
    image: postgres:14
    restart: unless-stopped
    volumes:
      - db_data:/var/lib/postgresql/data
    expose:
      - 5432
    networks:
      - windmill
    ports:
      - 5432:5432
    environment:
      POSTGRES_PASSWORD: changeme
      POSTGRES_DB: windmill
    healthcheck:
      test: ['CMD-SHELL', 'pg_isready -U postgres']
      interval: 10s
      timeout: 5s
      retries: 5

  windmill_server:
    image: ${WM_IMAGE}
    pull_policy: always
    deploy:
      replicas: 1
    restart: unless-stopped
    expose:
      - 8000
    environment:
      - DATABASE_URL=${DATABASE_URL}
      - MODE=server
    networks:
      - windmill
      - traefik
    depends_on:
      db:
        condition: service_healthy
    labels:
      - traefik.enable=true
      - traefik.http.services.windmill_server.loadbalancer.server.port=8000
      #http
      - traefik.http.routers.windmill_server_http.entrypoints=web
      - traefik.http.routers.windmill_server_http.rule=Host(`windmill.yourdomain.com`)
      - traefik.http.routers.windmill_server_http.service=windmill_server
      # https
      - traefik.http.routers.windmill_server_https.entrypoints=websecure
      - traefik.http.routers.windmill_server_https.rule=Host(`windmill.yourdomain.com`)
      - traefik.http.routers.windmill_server_https.service=windmill_server
      - traefik.http.routers.windmill_server_https.tls=true
      - traefik.http.routers.windmill_server_https.tls.certresolver=letsencryptresolver

  windmill_worker:
    image: ${WM_IMAGE}
    pull_policy: always
    deploy:
      replicas: 3
      resources:
        limits:
          cpus: '1'
          memory: 2048M
    restart: unless-stopped
    environment:
      - DATABASE_URL=${DATABASE_URL}
      - MODE=worker
      - WORKER_GROUP=default
    networks:
      - windmill
    depends_on:
      db:
        condition: service_healthy
    # to mount the worker folder to debug, KEEP_JOB_DIR=true and mount /tmp/windmill
    volumes:
      # mount the docker socket to allow to run docker containers from within the workers
      - /var/run/docker.sock:/var/run/docker.sock
      - worker_dependency_cache:/tmp/windmill/cache

  ## This worker is specialized for "native" jobs. Native jobs run in-process and thus are much more lightweight than other jobs
  windmill_worker_native:
    # Use ghcr.io/windmill-labs/windmill-ee:main for the ee
    image: ${WM_IMAGE}
    pull_policy: always
    deploy:
      replicas: 2
      resources:
        limits:
          cpus: '0.1'
          memory: 128M
    restart: unless-stopped
    environment:
      - DATABASE_URL=${DATABASE_URL}
      - MODE=worker
      - WORKER_GROUP=native
    networks:
      - windmill
    depends_on:
      db:
        condition: service_healthy

  ## This worker is specialized for reports or scraping jobs. It is assigned the "reports" worker group which has an init script that installs chromium and can be targeted by using the "chromium" worker tag.
  #  windmill_worker_reports:
  #    image: ${WM_IMAGE}
  #    pull_policy: always
  #    deploy:
  #      replicas: 1
  #      resources:
  #        limits:
  #          cpus: "1"
  #          memory: 2048M
  #    restart: unless-stopped
  #    environment:
  #      - DATABASE_URL=${DATABASE_URL}
  #      - MODE=worker
  #      - WORKER_GROUP=reports
  #    networks:
  #      - windmill
  #    depends_on:
  #      db:
  #        condition: service_healthy
  #    # to mount the worker folder to debug, KEEP_JOB_DIR=true and mount /tmp/windmill
  #    volumes:
  #      # mount the docker socket to allow to run docker containers from within the workers
  #      - /var/run/docker.sock:/var/run/docker.sock
  #      - worker_dependency_cache:/tmp/windmill/cache

  lsp:
    image: ghcr.io/windmill-labs/windmill-lsp:latest
    pull_policy: always
    restart: unless-stopped
    networks:
      - windmill
      - traefik
    expose:
      - 3001
    volumes:
      - lsp_cache:/root/.cache
    labels:
      - traefik.enable=true
      - traefik.http.services.windmill_lsp.loadbalancer.server.port=3001
      #http
      - traefik.http.routers.windmill_lsp_http.entrypoints=web
      - traefik.http.routers.windmill_lsp_http.rule=Host(`windmill.yourdomain.com`)
      - traefik.http.routers.windmill_lsp_http.service=windmill_lsp
      # https
      - traefik.http.routers.windmill_lsp_https.entrypoints=websecure
      - traefik.http.routers.windmill_lsp_https.rule=Host(`windmill.yourdomain.com`)
      - traefik.http.routers.windmill_lsp_https.service=windmill_lsp
      - traefik.http.routers.windmill_lsp_https.tls=true
      - traefik.http.routers.windmill_lsp_https.tls.certresolver=letsencryptresolver

  multiplayer:
    image: ghcr.io/windmill-labs/windmill-multiplayer:latest
    deploy:
      replicas: 0 # Set to 1 to enable multiplayer, only available on Enterprise Edition
    restart: unless-stopped
    networks:
      - windmill
    expose:
      - 3002

volumes:
  db_data: null
  worker_dependency_cache: null
  lsp_cache: null

networks:
  windmill:
    name: windmill
  traefik:
    name: traefik
    external: true
Deployment
Once you have setup your environment for deployment, you can run the following command:
docker compose up
That's it! Head over to your domain and you should be greeted with the login screen.
In practice, you want to run the Docker containers in the background so they don't shut down when you disconnect. Do this with the --detach or -d parameter as follows:
docker compose up -d
Default e-mail is admin@windmill.dev and the password is changeme.
Set up limits for workers and memory
From your docker-compose, you can set limits for consumption of workers and memory:
windmill_worker:
  image: ${WM_IMAGE}
  pull_policy: always
  deploy:
    replicas: 3
    resources:
      limits:
        cpus: "1"
        memory: 2048M
It is useful on Enterprise Edition to avoid exceeding the terms of your subscription.
Update
To update to a newer version of Windmill, all you have to do is run:
docker compose stop windmill_worker
docker compose pull windmill_server
docker compose up -d
Database volume is persistent, so updating the database image is safe too. Windmill provides graceful exit for jobs in workers so it will not interrupt current jobs unless they are longer than docker stop hard kill timeout (30 seconds).
It is sufficient to run docker compose up -d again if your Docker is already running detached, since it will pull the latest :main version and restart the containers.
NOTE: The previous images are not removed automatically, you should also run docker builder prune to clear old versions.
Reset your instance
Windmill stores all of its state in PostgreSQL and it is enough to reset the database to reset the instance. Hence, in the setup above, to reset your Windmill instance, it is enough to reset the PostgreSQL volumes. Run:
docker compose down --volumes
docker volume rm -f windmill_db_data
and then docker compose up -d.
Helm Chart
We also provide a convenient Helm Chart for Kubernetes-based self-hosted set-up.
Detailed instructions can be found in the README file in the official repository of the chart.
If you're familiar with Helm and want to jump right in, you can deploy quickly with the snippet below.
# add the Windmill helm repo
helm repo add windmill https://windmill-labs.github.io/windmill-helm-charts/
# install chart with default values
helm install windmill-chart windmill/windmill  \
      --namespace=windmill             \
      --create-namespace
Detailed instructions in the official repository.
Enterprise deployment with Helm
The Enterprise edition of Windmill uses different base images and supports additional features.
See the Helm Chart repository README for more details.
To unlock EE, set in your values.yaml:
enterprise:
	enable: true
You will want to disable the postgresql provided with the helm chart and set the database_url to your own managed postgresql.
For high-scale deployments (> 20 workers), we recommend using the global S3 cache. You will need an object storage compatible with the S3 protocol.
Run Windmill without using a Postgres superuser
Create the database with your non-super user as owner:
CREATE DATABASE windmill OWNER nonsuperuser
As a superuser, create the windmill_user and windmill_admin roles with the proper privileges, using:
curl https://raw.githubusercontent.com/windmill-labs/windmill/main/init-db-as-superuser.sql -o init-db-as-superuser.sql
psql <DATABASE_URL> -f init-db-as-superuser.sql
where init-db-as-superuser.sql is
this file.
Then finally, run the following commands:
GRANT windmill_admin TO nonsuperuser;
GRANT windmill_user TO nonsuperuser;
NOTE: Make sure the roles windmill_admin and windmill_user have access to the database and the schema:
You can ensure this by running the following commands as superuser while inside the database. Replace the schema
name public with your schema, in case you use a different one:
GRANT USAGE ON SCHEMA public TO windmill_admin;
GRANT USAGE ON SCHEMA public TO windmill_user;
Self-Hosted Instance Set-up
Complete New Windmill Set-Up
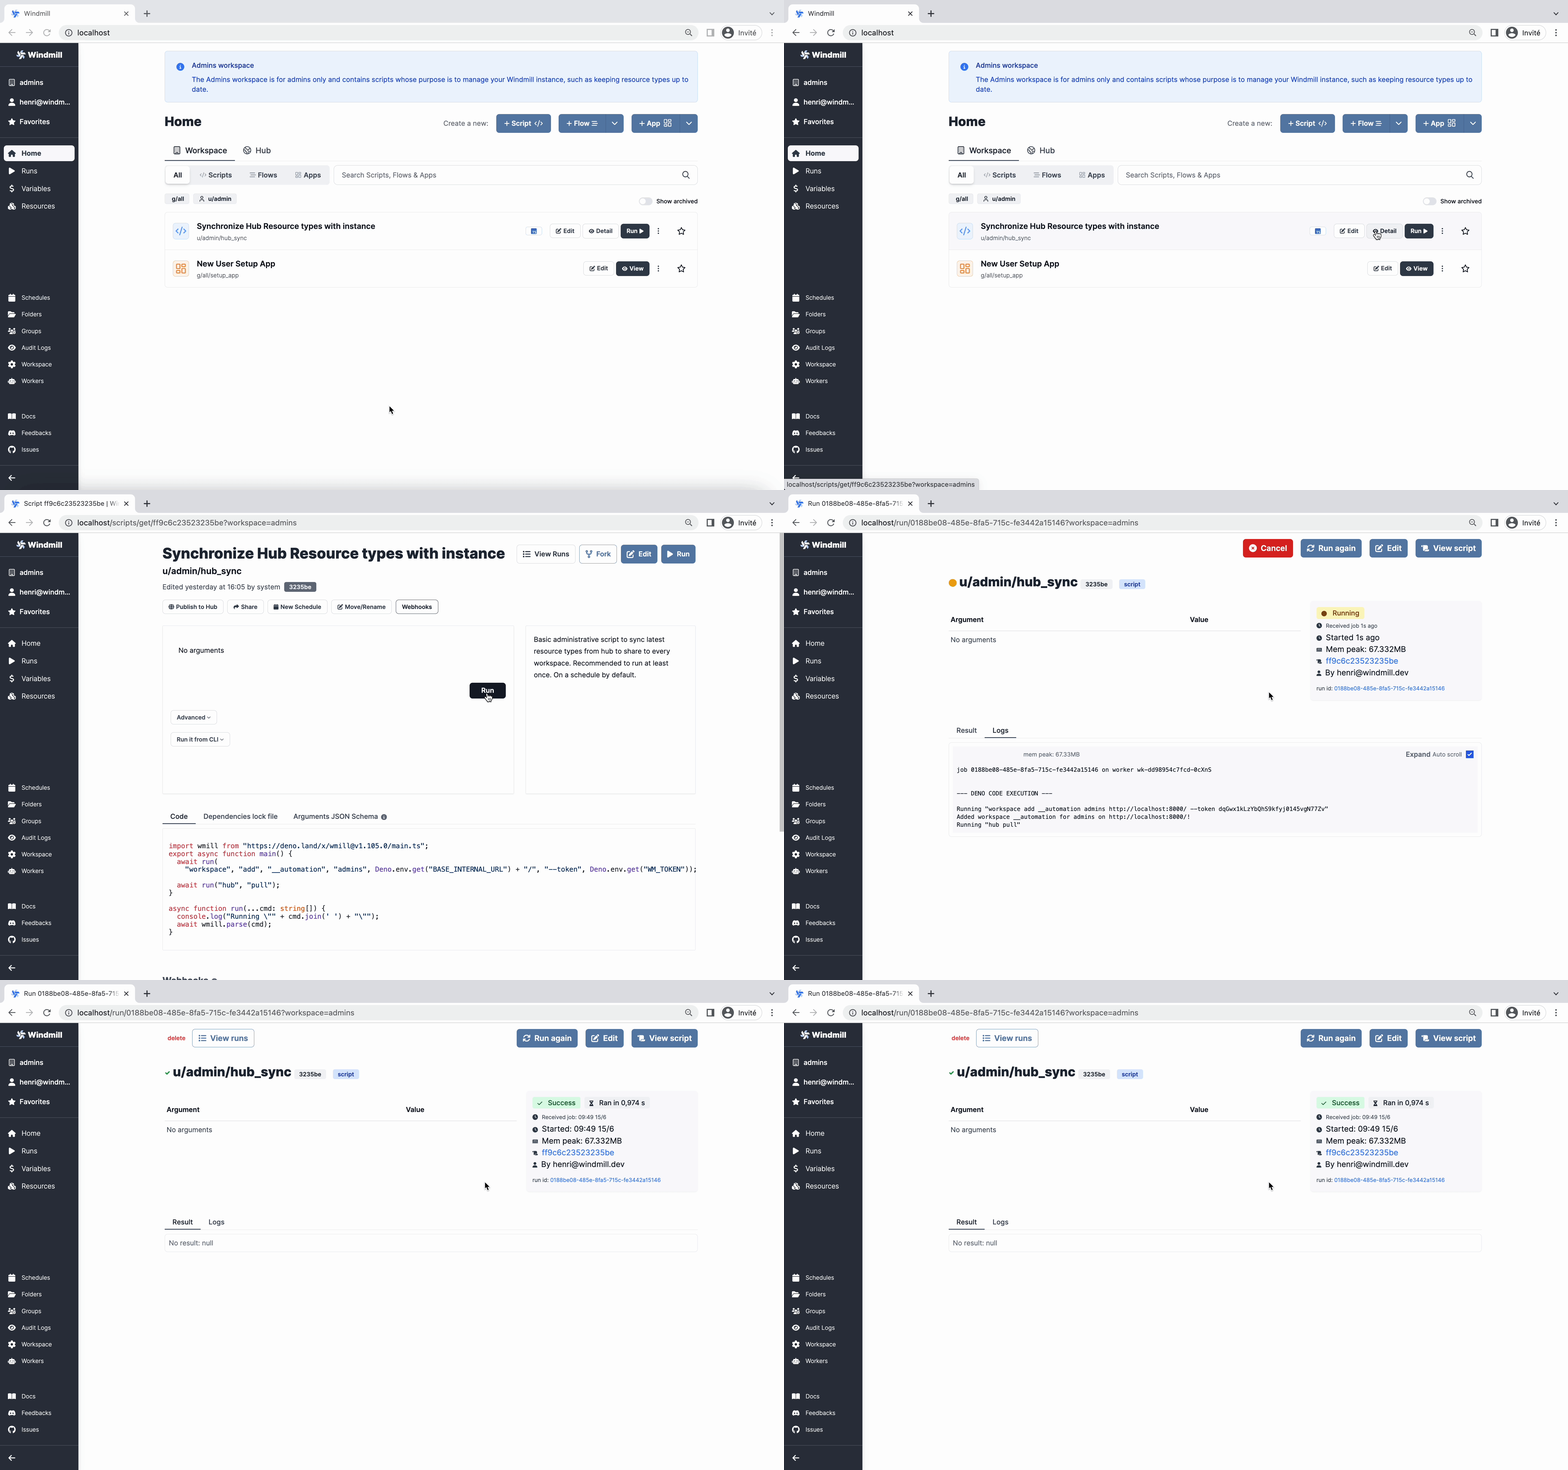
In the Admin Workspace execute the New User Setup App. This will import the default resources types from WindmillHub and update the default user credentials.
Authentication and user management
We recommend setting up SSO with OAuth if you want to avoid adding users manually.
If not using OAuth SSO, we recommend setting up SMTP to send invites and email to manually added users.
Set-up SMTP from the .env file (depreciated)
The relevant environment variables are:
SMTP_FROM=windmill@domain.com
SMTP_HOST=smtp.gmail.com
SMTP_PORT=587
SMTP_USERNAME=email@domain.com
SMTP_PASSWORD=app_password
If you used the Setup Windmill on localhost method, open the .env file in any text editor. You can use nano, vim, or any other editor you're comfortable with.
nano .env
Append the following to the end of your .env file:
SMTP_FROM=windmill@domain.com
SMTP_HOST=smtp.gmail.com
SMTP_PORT=587
SMTP_USERNAME=your_email@gmail.com
SMTP_PASSWORD=your_app_password
Make sure to replace your_email@gmail.com with your actual Gmail email address and your_app_password with the app password you've generated from Gmail.
Note: If you're using Gmail, you'll need to generate an App Password to use as
SMTP_PASSWORD. This is a unique password that Gmail provides for apps and services that want to connect to your account.
Save and Close the File:
- If using
nano, pressCTRL + Oto save and thenCTRL + Xto exit. - If using
vim, pressEsc, then type:wqand pressEnter.
Restart your Windmill application:
- Since you've made changes to the
.envfile, you'll need to restart your Windmill application for the changes to take effect.
docker compose down
docker compose up -d
Now, your Windmill instance should use the SMTP settings you've provided to send invites and email to manually added users. Make sure the SMTP details you've provided are correct and that the Gmail account you're using has allowed less secure apps or generated an App Password.
Set up SMTP from the UI
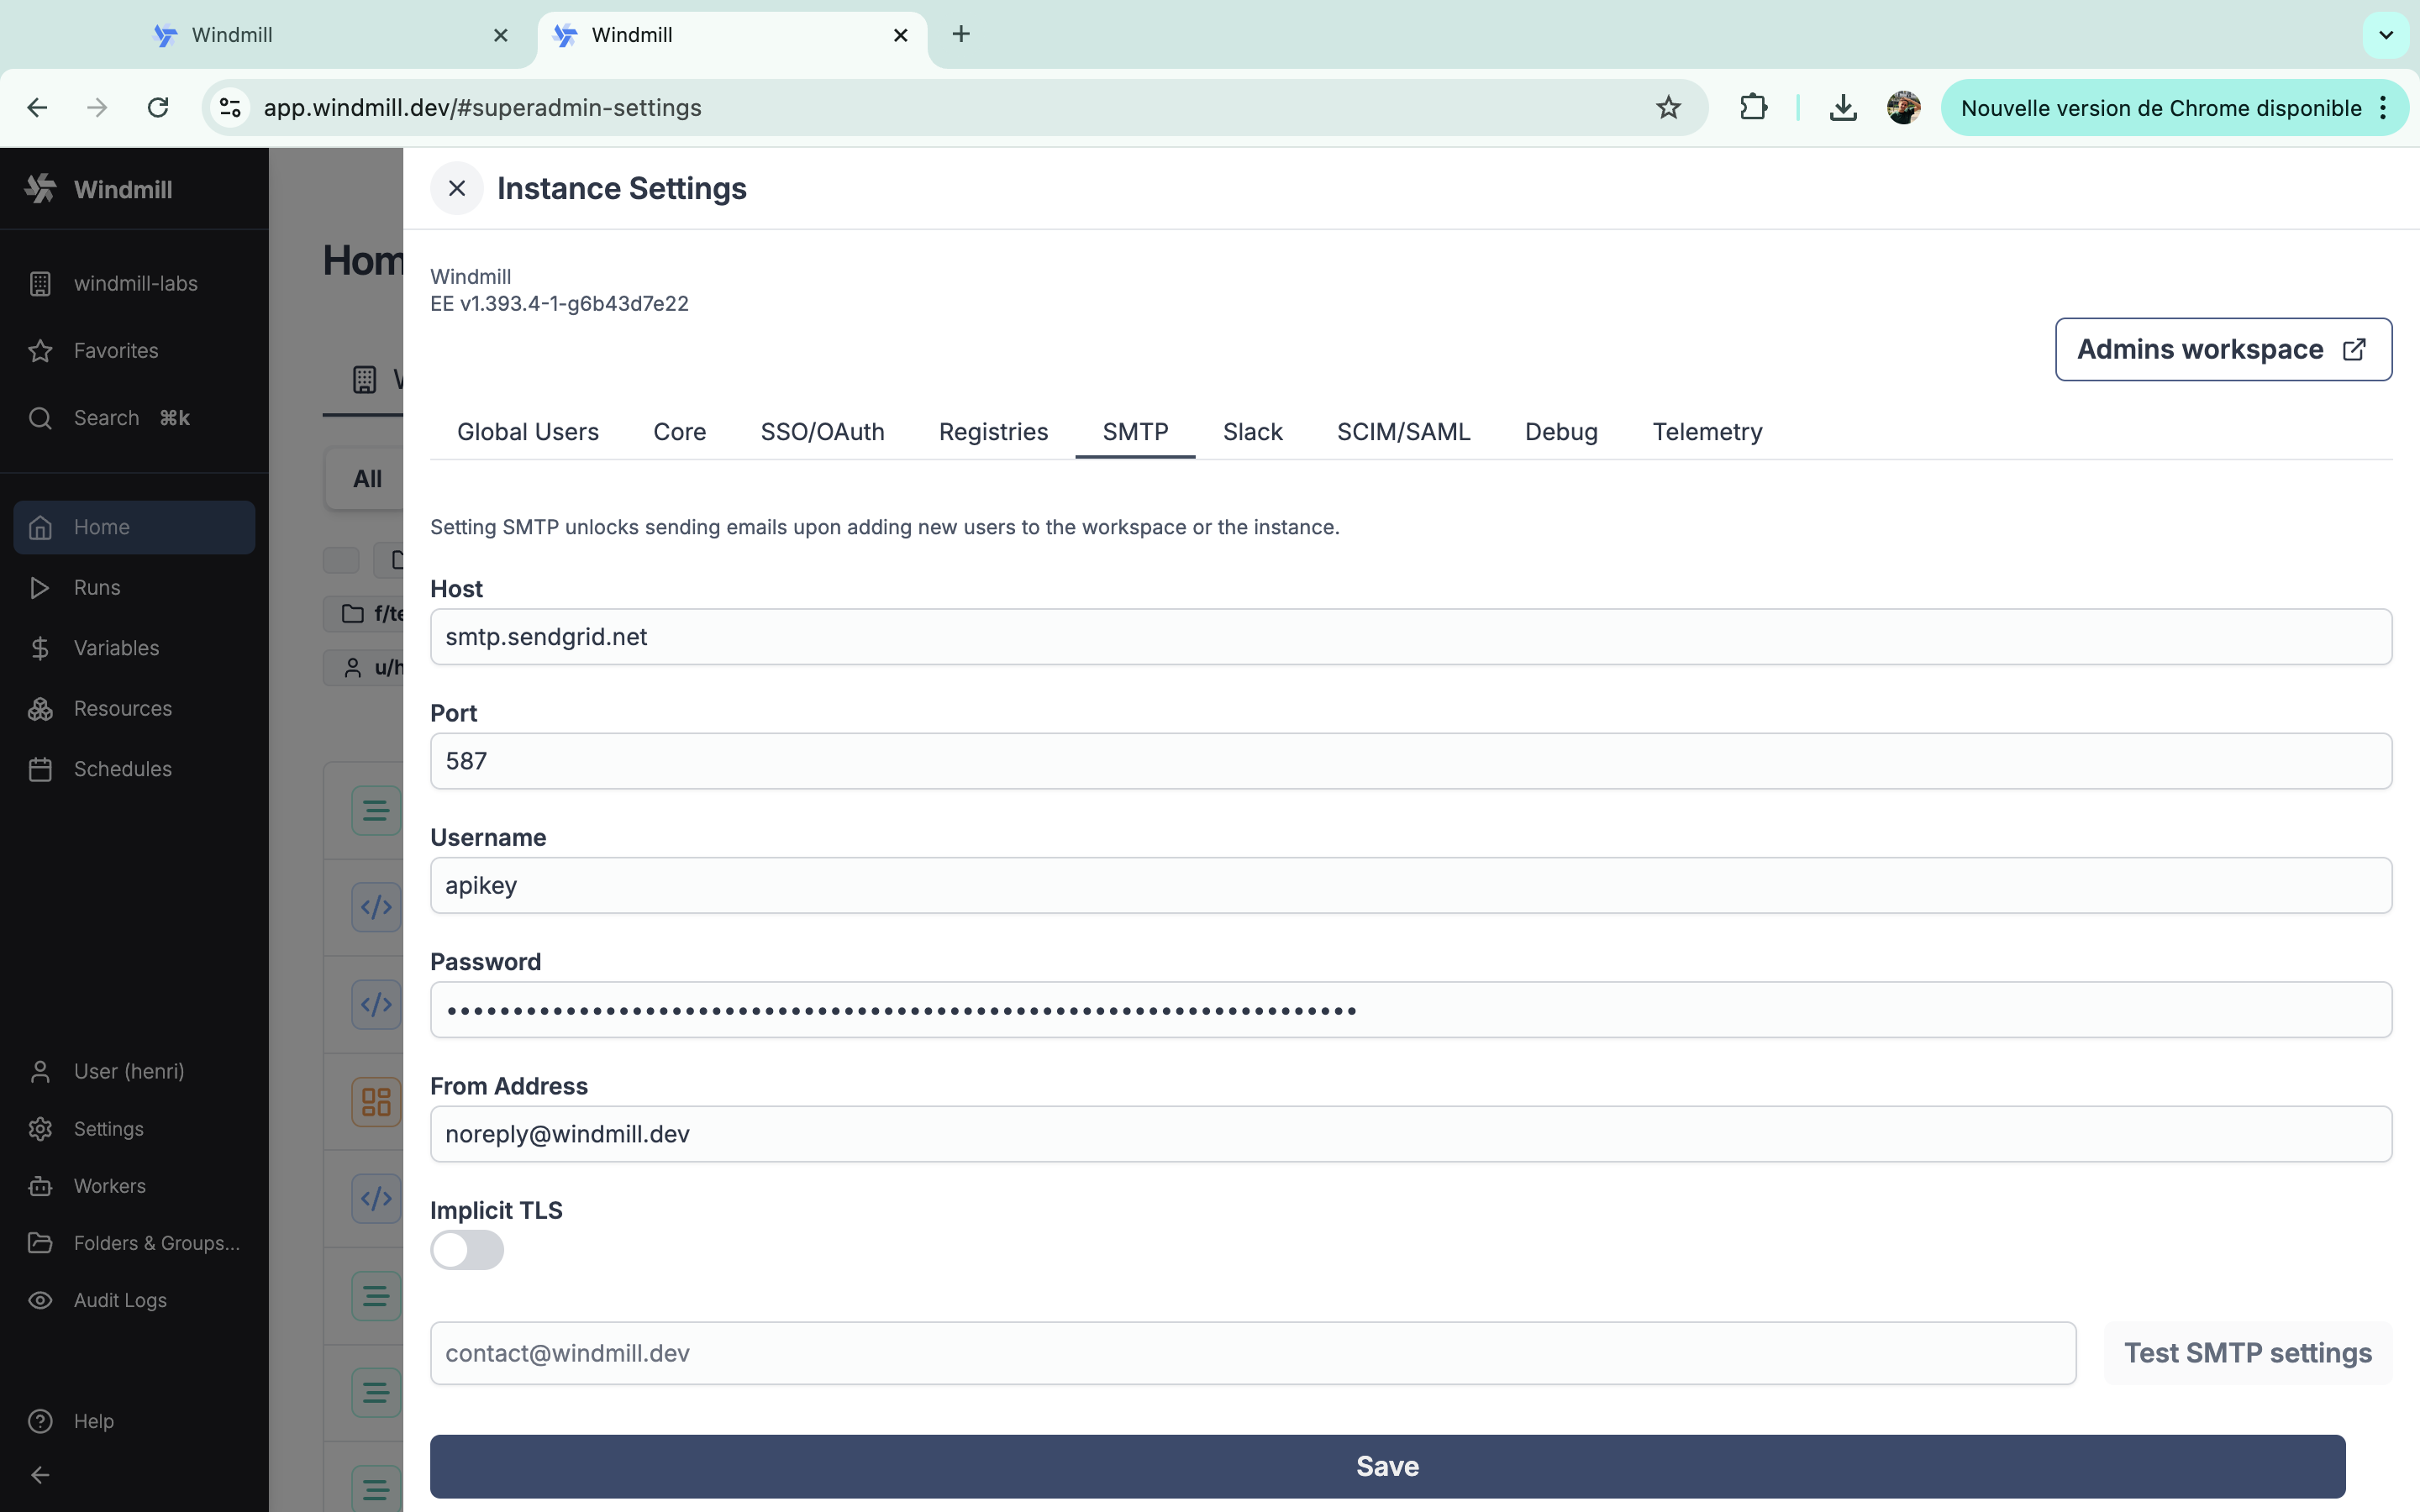
From your self-hosted instance, click on your username and pick Instance settings and "SMTP" tab.

Fill your SMTP details.
Note: If you're using Gmail, you'll need to generate an App Password to use as SMTP_PASSWORD. This is a unique password that Gmail provides for apps and services that want to connect to your account.
You'll be offered to "Test SMTP settings" & send a blank e-mail to a given address.
Manually add user to instance
Manually add user to workspace
Set up Auto-Invites
When creating a workspace, you have the option to invite automatically everyone on the same domain. That's how you make sure that anyone added to the instance is also added to the workspace.
Create a new workspace.
Admins Workspace
What distinguishes the admin workspace from other workspaces is that its resource types are shared with all workspaces.
If you skipped the instance setup or need to sync resource types, you can go to the admins workspace and run the Synchronize Hub Resource types with instance script, or schedule it.

Rename Workspace
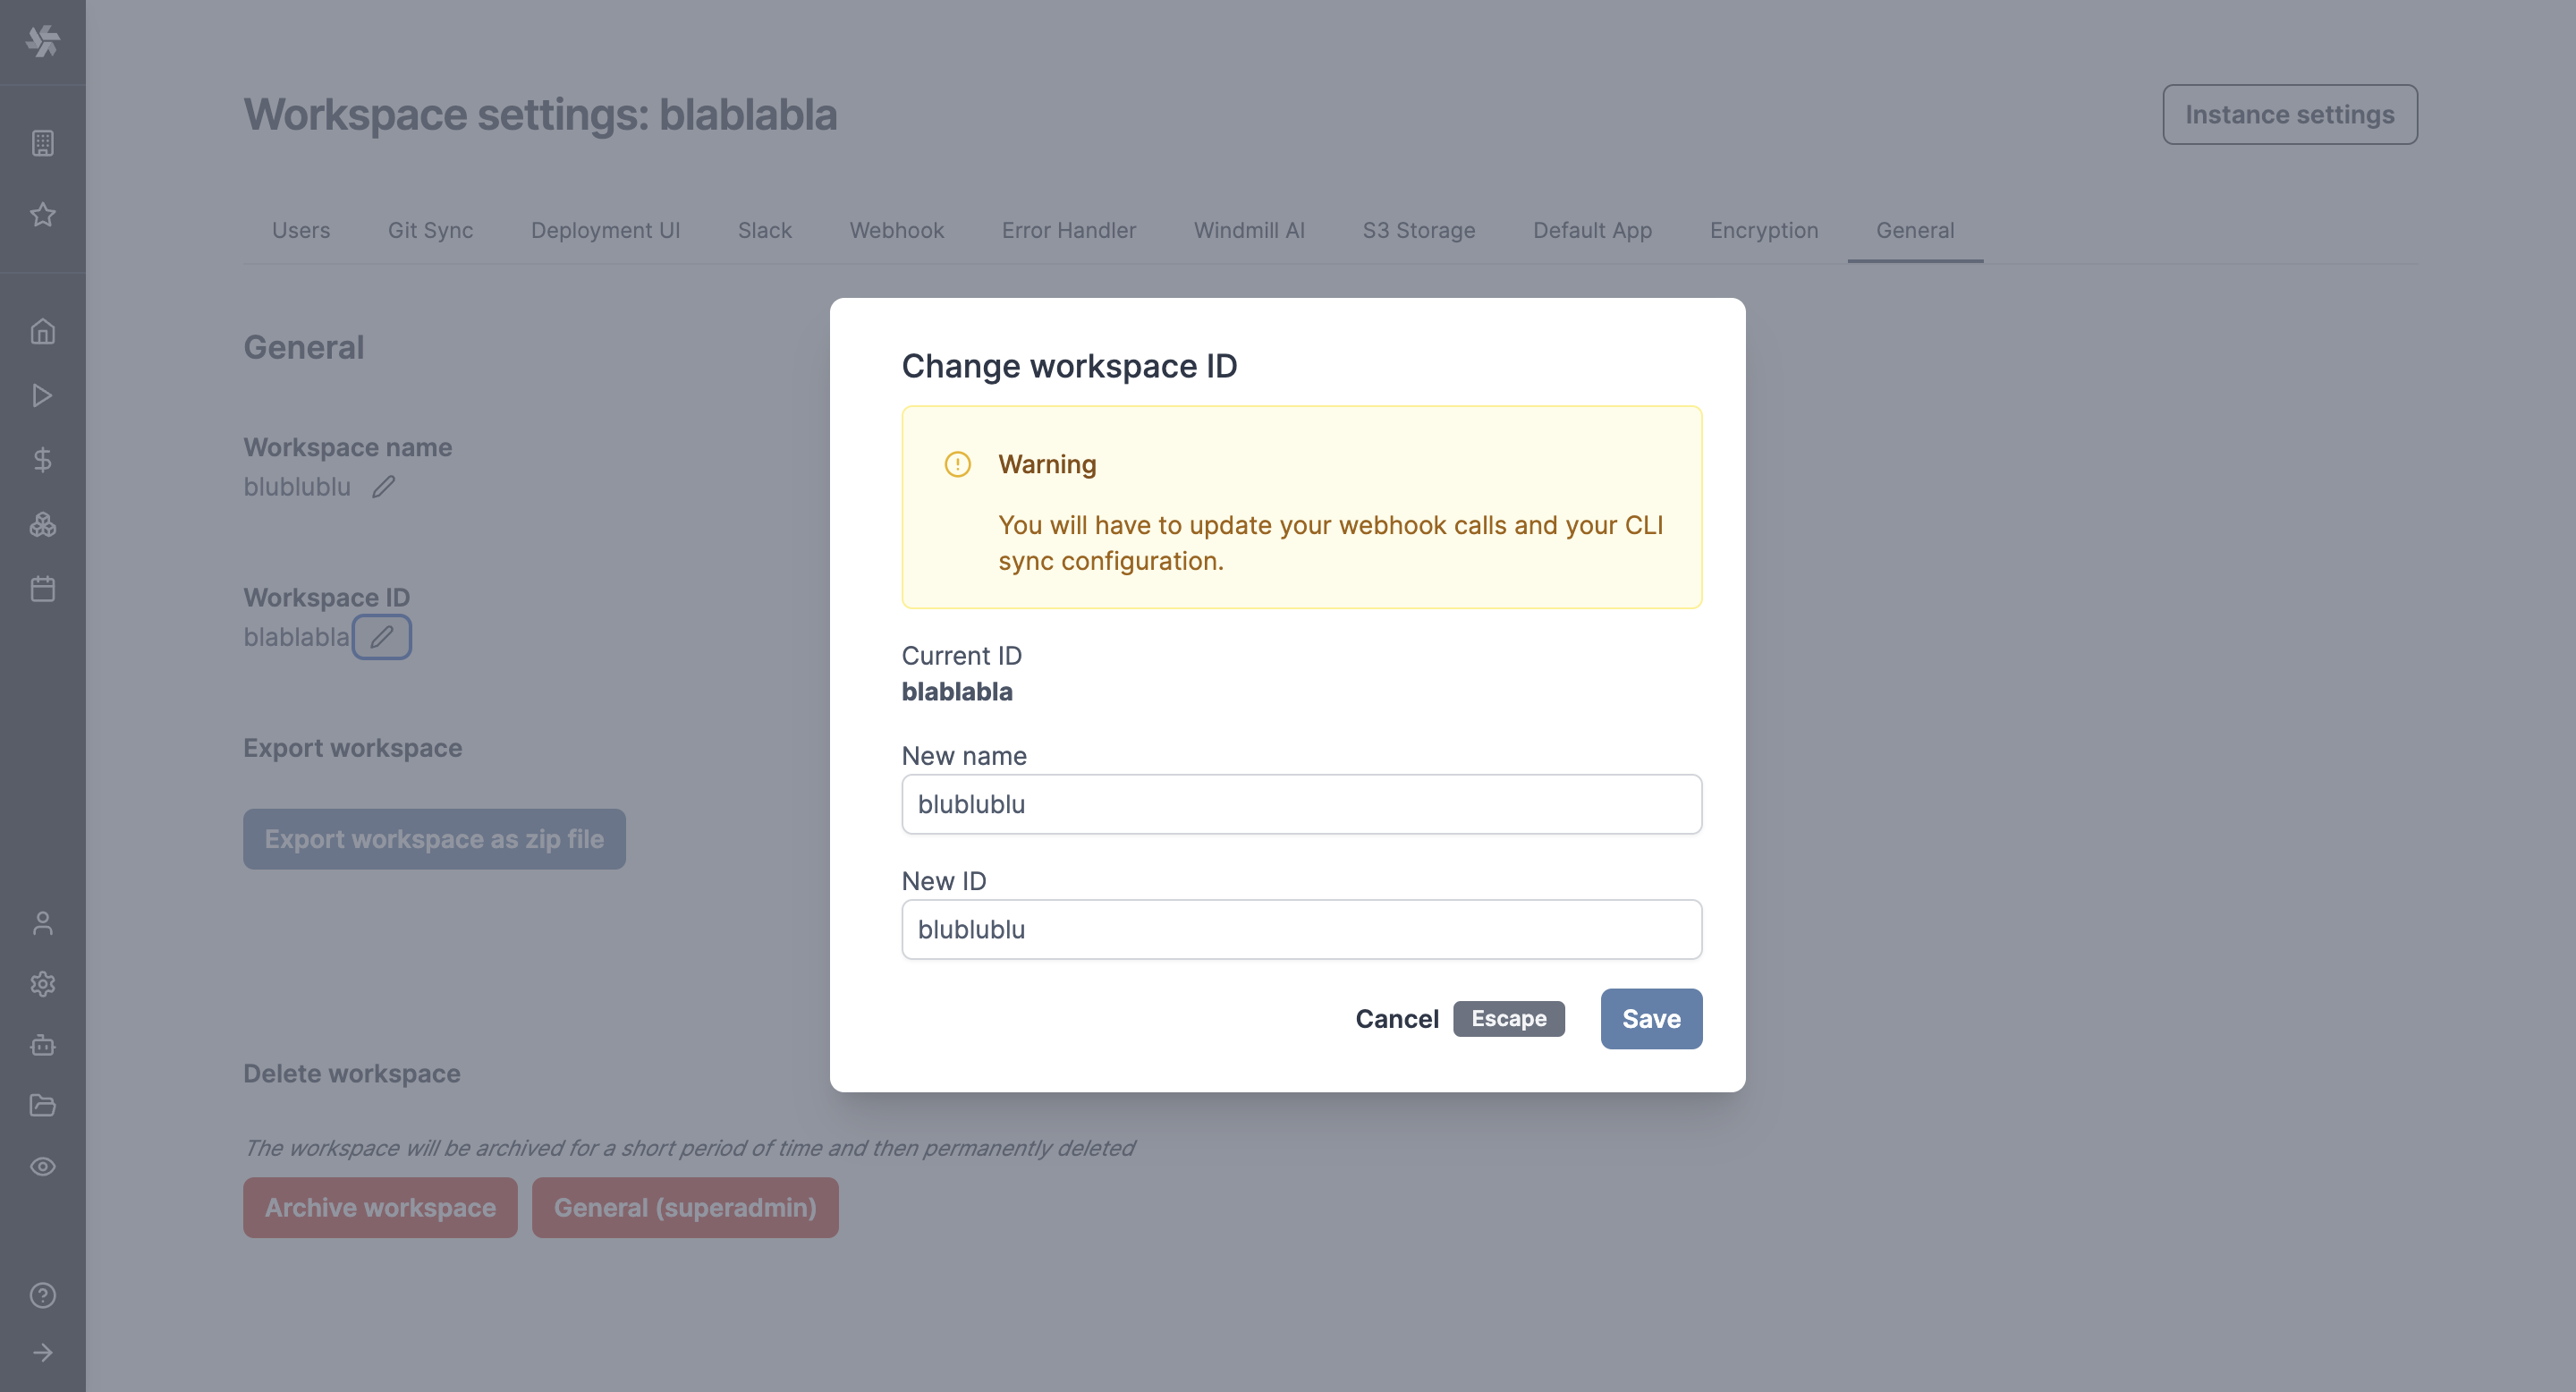
On self-hosted instances, workspaces can have names and IDs updated from the workspace settings.
If you update the ID of a workspace, make sure to also update your webhook calls and your CLI sync configuration.
Workspace name and ID can be updated only for admin.

For more advanced setups, see Helm Chart.
Self-signed certificates
Detailed guide for using Windmill with self-signed certificates here (archived version).
TL;DR: below
Mount CA Certificates in Windmill:
- Ensure CA certificate is base64 encoded and has .crt extension.
- Create a directory for CA certificates.
- Modify docker-compose.yml to mount this directory to /usr/local/share/ca-certificates in read-only mode.
- Use INIT_SCRIPT in the worker config to run update-ca-certificates in worker containers.
Establish Deno’s Trust:
Set environment variable DENO_TLS_CA_STORE=system,mozilla in docker-compose.yml for Windmill workers.
Configure Python (requests & httpx) Trust:
Set REQUESTS_CA_BUNDLE=/etc/ssl/certs/ca-certificates.crt & SSL_CERT_FILE with the same value in the worker’s environment variables.